The DIY Faux Butcher Block Countertop: The Tutorial
- Oct 6, 2023
- 5 min read
Updated: Apr 13, 2024
Butcher Block Beauty on a Budget
Imagine a 90s-style stone surface, complete with flesh-toned hues reminiscent of a bygone era, awkwardly paired with 1950s cabinetry. It was a classic case of clashing aesthetics, but with a full kitchen remodel in our future, I was looking for a temporary, budget-friendly solution that would add warmth and charm to our historic home. However, with a major renovation on the horizon, I needed a temporary and affordable option. That's when I stumbled upon a thin walnut plank product that ticked all the boxes: cost-effective, pliable as I had a few curves to deal with, and visually striking - who doesn't love the richness of walnut?
Tools of the Trade:
Before embarking on this adventure, you'll want to ensure you have the right tools for the job. Here's your checklist:
Wood planks (your faux butcher block)
Liquid Nail Fuse It Max (your trusty adhesive)
Rubiomonocoat in Pure finish (the final touch)
Caulk gun
Miter saw
Table saw
Clamps
Putty knife
Sander with a bundle of sanding discs
Paintbrush
Cloths or old t-shirts
Preparation and Planning:
My countertop's resilience surprised me. I had grand plans to rough up the existing countertop with sandpaper, but it turned out to be tougher than I imagined. Not a single scratch to the surface despite my best efforts, so I decided to keep it simple and a thorough cleaning was all it needed!
Choosing thin walnut planks (measuring just 1/8" thick) allowed for minimal bulk to be added to the countertop and flexibility – essential for working around curves which I had a few. To replicate the classic look of butcher block, I did a dry fit, and arranged the planks in a 1/3 pattern.
Installation:
1) After the dry fit, I started simply gluing down the planks one at a time using Liquid Nail Fuse It Max. It's important to use the "Fuse It Max" because the moisture content in regular Liquid Nail is too high and will cause the boards to warp.
Make sure to fit the boards as tightly together as possible.
For the edges of the countertop, I installed the boards 1/8" (the thickness of one board) over the edge in anticipation that I would be gluing smaller pieces to the fronts of the edges and this would eventually make it flush.


2) For the edges and the backsplash I cut down some of the planks to fit the depth of the countertop.
3) Once they were cut down I glued with the Liquid Nail Fuse It Max and then taped to secure until it dried.
Because of all of the additional cuts, the backsplash proved to be a pain in the you-know-where - so if I were to do this project again, I might consider removing that 4" piece that runs along the back and install some other type of backsplash like tile or headboard.
4) The CURVES. Oh the curves! I ended up making a few forms out of scrap wood. Once the forms were screwed together, I soaked a few pieces of wood (already cut to size) in hot water for a couple of hours. Once the wood was bendable, I bent it into the forms and let it dry. Once it was dry, it kept it's shape and was able to be installed.
I had to soak a few extra pieces because some of them will snap in the process of bending them in the form.


5) I applied adhesive and installed the curved pieces but, for the sink, I wedged a piece of scrap wood instead of using tape to hold it secure as it dried. I filled in any voids near the corners with additional adhesive.
6) For the outer edge curve, I used clamps to hold in place as the adhesive dried.


7) I filled in all of the seams between boards with walnut wood filler. This is actually a step that I wish I had spent more time on. Overall, the project still turned out great, but as with any project, the more effort you put into prepping and detail, the better the overall result will be. Take you time with this step!
If you want it blend more seamlessly, its best to get a filler that matches the species of the wood that you are using.
8) Sanding, sanding and more sanding. This step is quite dusty, even more than I was prepared for, so beware. I rounded the edges of the overhang a bit with the sander as well to make them less sharp and to also blend the two pieces together a little better.


9) Once the surface was sanded, I used a tack cloth to remove any remaining dust to ensure a smooth finish.
10) I applied Rubiomonocoat according to the instructions. (I used the "pure" finish). This involved mixing the product together. I poured directly on the surface and then used a burnisher to spread it over the area. I used a brush to help with any vertical surfaces like the front overhang and backsplash. After the product sits for about 15 minutes, I used a clean dry cloth to wipe the excess from the surface. I would recommend using gloves, which I did not do, to make cleaning up much easier!
I like Rubiomonocoat for several reasons:
It's a natural, food safe finish. Rubio can be used on charcuterie boards in direct contact with food. Even though I don't plan to cut anything directly on the surface, it's important for it to be food safe just in case. (Note: they do not recommend using Rubio on a surface such as a cutting board because sharp instruments can break the seal and create an avenue for water and other contaminants to get inside the surface.
It's highly water resistant.
It's easy to apply. One coat and it's done! No need for multiple coats of stain and poly.
It can be repaired. I anticipated, due to the temporary nature of this project, that I may need to do some repairs down the road. With traditional stain, you would have to sand an entire surface to do a repair because traditional stain will overlap old stain and you can see the repair. With Rubio, the product actually bonds with the wood and so there is NO OVERLAP which is a game changer when it comes to spot repairs!
11) Let it cure for 24-48 hours (I only waited 24) and then ENJOY!


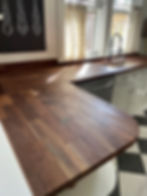
The Result:
A timeless look that effortlessly compliments the historic charm of our home while infusing a sense of character into our modern lives. While this project may have raised a few eyebrows along the way, in the end, I'm head over heels for the result. After all, isn't the essence of homemaking about turning a space into something that's unmistakably yours?
Curious about how my faux butcher block has held up over time? For a detailed update and to see if it's still a kitchen superstar, check out my follow-up blog post coming soon!
And there you have it – a journey from dated to delightful! Stay tuned for more captivating tales as we continue to transform our home, one project at a time!